

 Use your PC to Master Japanese and Chinese
Word Processor Edit menu
UnDo
Ctrl+Z
The UnDo command reverses the last editing or formatting action. Use
Keyboard | Enable UnDo to enable or disable this function.
ReDo
The ReDo command re-does the last un-do.
Clear
Delete
Clear deletes all selected (highlighted) text, and deletes objects.
Cut
Ctrl+X
Cut is similar to
Copy(3-
9)
command, except it also deletes the selected (highlighted) text or object from
the current document.
Note: because ^X is used for the Edit | Cut command, it is not available
for insertion into the text, and cannot be used to create a new katakana text
object. Use ^T (Ctrl+T) instead.
Copy
Ctrl+C
Copy copies the highlighted text or object into the
Windows clipboard(D-
-
9),
and into the
clipboard(4-
3)
window, for later pasting. Use the copy command to export text to other
applications.
- For repeated exporting of common words, names, or phrases, consider using
the Edit
Copy Range(3-
10)
command.
Paste
Ctrl+V
Paste copies all the text in the
clipboard window(4-
3)
window into the document starting at the text
insertion point(5-
1).
Use Paste Special to copy from the
Windows clipboard(D-
-
9).
Selections with fewer than 128 keystrokes are inserted as a macro (i.e. just as
if the keys had been pressed from the keyboard). Otherwise, the entire
selection is quickly inserted, and the entire window redrawn.
Note: because ^V is used for the Paste command, it is not available for
insertion into the text, and cannot be used to create a new bopomofo text
object. Use ^B (Ctrl+B) instead.
Copy Range
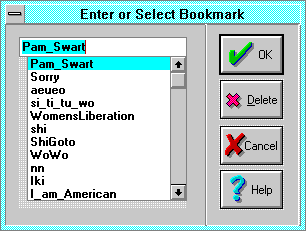 The Copy Range command copies a named range of text to the
Windows clipboard(D-
-
9)
for use as a linked
OLE(D-
-
5)
object in another application. To export text for an embedded or
static object, you can also use the Edit
Copy(3-
9)
command.
For an explanation of the dialog box controls, see the
Bookmark(3-
11)
command.
Select an existing bookmark or define a new bookmark to export the
corresponding text as a named range. Paired bookmarks define a selection.
Open-ended bookmarks define a beginning point: the exported text will start at
the bookmark, and continue to the end of the document. However, the exported
text cannot exceed a bounding rectangle supplied by the client, so exported
text can fit on one page only. See
Managing Exported Text(10-
2).
Paste Special
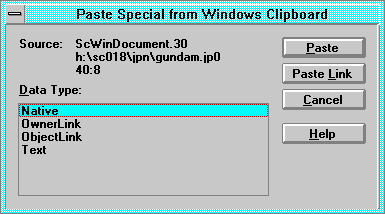 The Paste Special command pastes one of various different
Windows clipboard(D-
-
9)
formats into your document. The Paste Link option creates a link to
information in another application.
Source displays the source application and the name of the file
containing the original copy of the object.
- Data Type lists the presentation formats available for the
information on the Windows clipboard. These vary from application to
application. Those in the list that have a format ending with the word
object, as in Paint Picture Object are not used for
linking, only to embed objects.
- Object is picture representation of the clipboard contents and the
data you need to edit the object. The name of the object in the list will vary
depending on the clipboard contents.
- Formatted Text is text with formatting (e.g., text from an English
word processor).
- Unformatted Text is plain text with no formatting.
- Picture is scalable vector picture representation.
- Bitmap is the representation used by pictures from
Paint(D-
-
6),
or from pressing Alt+PrintScreen.
- Paste inserts the Windows clipboard contents into your document in
the format chosen.
- Paste Link inserts the Windows clipboard contents into the document
and creates a link with the other application to update the data automatically
or on demand. This button is unavailable unless the clipboard contents come
from an application that can link data to Smart Characters.
Word Space
SpaceBar
It is far easier to press the SpaceBar than to use the Word Space
command to insert a variable or fixed word space into the text. Word spacing is
fixed in input modes (e.g., English) that use spaces.
variable word spacing(4-
14)
is controlled by the Format | Annotations command.
Page Break
The Page Break command inserts a hard page break at the
insertion point(5-
1)
into your document. Breaks in a Smart Characters document appear as light
dotted lines across the window, except in page layout view, where you see how
the actual page will appear when printed.
Target
The Target command marks the current single-line paragraph as a hypertext
topic header(12-
3)
by inserting a
hypertext(D-
-
4)
target code (Ctrl+^) at the start of the line. Topic headers can be jumped to
by selecting a corresponding hypertext
topic reference(12-
3).
Reference
The Reference command converts selected the text into a hypertext
topic reference(12-
3)
by inserting a pair of
hypertext(D-
-
4)
reference codes (Ctrl+A) and a
topic reference pointer(12-
3)
around the text. The selected text should exactly match a corresponding
hypertext
topic header(12-
3).
See the
Target(3-
11)
command. After using the Translate
Compile Hypertext(3-
34)
command to compile the file, selecting the reference will jump the
insertion point(5-
1)
to the hypertext target.
Bookmark
 The Bookmark dialog defines or deletes a bookmark. Additionally, the
Edit
Copy Range(3-
10)
command invokes this dialog to export a range of text to other applications. To
go to a bookmark, use the Edit
Goto(3-
15)
command.
Bookmarks may be open-ended or paired. Open-ended bookmarks are inserted at the
insertion point(5-
1),
while paired bookmarks are inserted around selected text or graphics.
- Bookmark Name is the name of the bookmark to add or export. Select a
name from the list box, or type in a new name. Names can contain letters,
numbers, and underscores (_).
- OK adds or exports the bookmark.
- Delete deletes the bookmark (but not the text).
Edit Text Object dialog
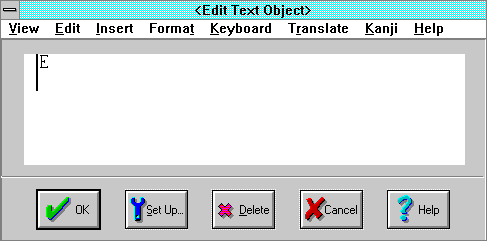 The Edit Text Object dialog is a miniature document window used to edit
compound objects in a document. It is invoked to insert a new object by
the Edit | Insert
Header(3-
11),
Footer(3-
12),
and
Footnote(3-
12)
commands.
To edit or delete an existing object, use the View
Page Layout(3-
6)
command, locate the object, and click it to invoke the dialog.
- OK inserts or updates the compound object in the document.
- Delete deletes the compound object.
- Setup invokes an optional dialog appropriate to the type of object.
Header
The Header command invokes the Edit Text Object dialog to insert
a new header, a title or graphic that prints in the top margin of each
page. Headers do not appear in normal view. To edit or delete an existing
header, see
Edit Text Object(3-
11).
Headers are stored in compound objects, which are inserted into the text
at the insertion point. Header objects at the top of a page display beginning
with that page, otherwise they display beginning with the next page. Headers
repeat on following pages until the next header compound object.
Footer
The Insert Footer command invokes the Edit Text Object dialog to
insert a new footer, text that prints in the bottom margin of every page
(e.g., the date and page number). Footers do not appear in normal view. To edit
or delete an existing footer, see
Edit Text Object(3-
11).
Footers are stored in compound objects, which are inserted into the text
at the insertion point. Footers repeat until the next footer compound object.
Footnote
The Footnote command invokes the Edit Text Object dialog to
insert a new footnote, text that prints at the bottom of a page.
Footnotes do not appear in normal view. To edit or delete an existing footnote,
see
Edit Text Object(3-
11).
Footnotes print on the same page as the corresponding reference marks unless
you indicate otherwise. Footnote formatting is controlled by the
Footnote Settings(3-
22)
dialog.
Date & Time
The Date & Time command inserts today's date and time into the text
at the
insertion point(5-
1).
To insert a field code that always displays the current date and time, use
Edit | Insert Field | Date & Time.
Field Code
The Field Code command inserts a selected field code that displays a
document or system variable, such as the page number or the current date and
time.
Merge Code
The Merge Code command inserts a mail merge field code.
File
Insert File imports the selected file into the current window starting
at the
insertion point(5-
1)
(text cursor). If there is not enough memory to import the entire file, Smart
Characters displays the
File Too Large(A-
-
6)
message. Import the first part of the file, or cancel the request.
Object
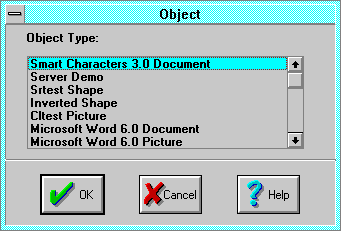 The Insert Object dialog command inserts an object from another
application, such as a
Paint(D-
-
6)
drawing, using
OLE (Object Linking and Embedding)(D-
-
5).
The application supplying the object will become active on your screen.
To insert an object linked to another file, switch to the application
that edits the other file, open the file and select the object you wish to link
to, then copy it to the
Windows clipboard(D-
-
9).
Switch back to Smart Characters, and use Paste Special | Paste Link to
paste it into the Smart Characters document.
To delete an object, use Edit | Clear.
Object Type selects the object you want to insert into your document.
Some common objects are drawings, graphs, spreadsheets, equations, and other
Smart Characters documents.
Links
 Use the Links dialog to display all the links you have in a document to
other applications such as
Paint(D-
-
6).
This command is unavailable if you have no links in your document.
Links displays all links in a document. The four columns contain the
application, file name, item name, and type or status of link.
- Update selects the type of link you want for the selected links in
the Links box:
- Automatic inserts new data as soon as it is available. Whenever a
change is made in the source file, that change is shown immediately in each
destination document. You don't have to request updates, and you always have
the most recent information.
- Manual inserts new data only when you ask for it by choosing the
Update Now button. You request changes from the source file when you
want them. This option gives you more control over your document.
- Locked prevents updates to a selected link. If you lock a link, the
Update Now option is unavailable. The information in the link is frozen
when you select this check box. Use this option when you have reached the final
version of the linked information and want to stop updating without canceling
the link.
- Open Source opens the source of a selected link. For example,
choosing the Open Source button opens up a linked drawing in
Paint(D-
-
6)
if you have a Paint drawing linked to your document.
- Update Now updates all links selected in the Links box.
- Cancel Link breaks links for all selected links between data and the
document.
- Change Link displays a dialog box so you can change the selected
link to receive data from another application, file, or item. See the Change
Link dialog box.
Activate Object
The Activate Object command opens the application in which the selected
object was created and displays the object so you can edit it. This command is
available only when you have selected an existing object in your document,
e.g., a drawing from
Paint(D-
-
6).
First, select the drawing, and then choose Paint Drawing Object from the
Edit menu to open Paint and display the object for editing.
Mouse shortcut: Double click the object with the left mouse button.
Join Text Objects
The Join Text Objects command combines separate
text objects(4-
1)
into one, regardless of the types of the objects being joined. This command
recovers from inadvertently splitting an object in two by typing an
object type code(D-
-
5)
with the
insertion point(5-
1)
in the middle of an existing object. Use this command sparingly. If you do not
like the results of a Join command, select
Undo(3-
9)
to reverse the join.
Find
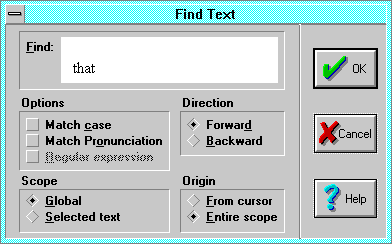 Text to Find: enter the text to find, or paste it from the internal
clipboard(4-
3)
window. Tip: observe the Pos indicator in the
status bar(5-
2)
or turn on the
Ascii Codes(5-
5)
window to make sure that any unwanted
object type codes(5-
11)
are not present. To find specific
object type(4-
2)
codes, see
Searching for Object Type Codes(3-
14).
Match case finds only those occurrences in English text with the
combination of uppercase and lowercase letters specified in the Text to
Find box.
- Whole words only finds occurrences of words by themselves, and not
part of a larger word.
Scope defines the starting and ending limits
of the search:
- Global searches the entire document.
- Selected text searches selected text only (if any). If there is no
selected text, the search fails.
- Direction sets the search direction to Forward or
Backward.
- Origin sets the origin of the search:
- From Cursor starts from the
insertion point(5-
1)
and ends at the beginning or end of the scope, depending on the search
direction.
- Entire Scope starts at either the beginning or end of the scope and
ends at the end or beginning of the scope, depending on the search direction.
Searching for Object Type Codes
You can search and replace an
object type code(D-
-
5)
by selecting View | Display Mode | ASCII Only. Otherwise, Smart
Characters ignores
object types(4-
2).
To see the codes, use View | Show Codes to activate the
Ascii Codes(5-
5)
window before activating the
Find(3-
13)
dialog.
Search Progress
 The tiny Press Space to Abort dialog interrupts searching or replacing
if you click the Abort button or press Space. The
hidden characters window(5-
4)
displays search progress.
Replace
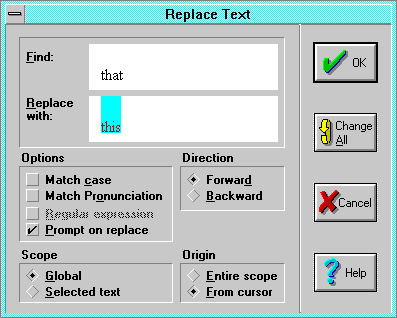 The Replace command searches for and replaces specified text or
formatting in the active document.
Find: enter the text you want to find, or paste it from the internal
clipboard(4-
3)
window. You can keep the last search target, recall a previous target with the
Up and Down arrow keys, or edit the target. Tip: observe the Pos
indicator in the
status bar(5-
2)
or turn on the
Ascii Codes(5-
5)
window to make sure that any unwanted
object type codes(5-
11)
are not present.
- Replace with: enter the text you want to use as replacement text, or
paste it from the clipboard window. Note: to completely remove the text in the
Find box from the document, leave the Replace With box empty.
- Options
- Match case finds only those occurrences in English text with the
combination of uppercase and lowercase letters specified in the Find
box.
- Whole words only finds occurrences of words by themselves, and not
part of a larger word.
- Prompt on replace invokes the
Confirm Replace(3-
15)
dialog to confirm each replacement.
- Scope defines the starting and ending limits of the search:
- Global searches the entire document.
- Selected text searches selected text only (if any). If there is no
selected text, the search fails.
- Direction sets the search direction to Forward or
Backward.
- Origin
- From Cursor starts from the
insertion point(5-
1)
and ends at the beginning or end of the scope, depending on the search
direction.
- Entire Scope starts at either the beginning or end of the scope and
ends at the end or beginning of the scope, depending on the search direction.
- All finds and replaces all instances of the text in the Find
box with the text in the Replace with box. You can
Undo(3-
9)
the replacements by choosing the Edit | Undo command.
- OK replaces the next instance of matching text only.
Confirm Replace
 If you selected Prompt on replace, and Smart Characters finds the search
target, the Replace the Selected Text dialog asks you to confirm
replacement:
Yes means replace this one and continue to ask.
- No means don't replace this one, but continue to search and ask.
- Change All means to replace this target, and continue to replace
all subsequent targets without asking.
- Cancel means don't replace or search any more.
Repeat Find or Replace
F3
The Repeat Find or Replace command repeats the last find or replace
command. Tip: you can press Ctrl+F3 to toggle the search direction before
pressing F3.
Go To
F5
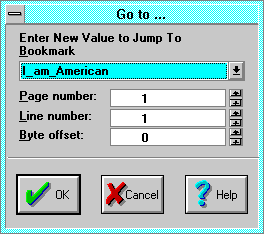 The Go To dialog displays the current bookmark, page, line, and byte
offset, and jumps to a specified location. Enter the new bookmark name or page,
line, or byte offset number, and select OK. Smart Characters scrolls the
document if necessary to keep the
insertion point(5-
1)
visible.
Bookmark searches for and positions the insertion point or selection at
the indicated named bookmark, if found.
Page number indicates the current page and positions the insertion point
at the beginning of the nearest page with the specified page number. Smart
Characters inserts pages and page numbers only if the
display mode(3-
7)
is set to Page.
- Line number indicates the
current line(D-
-
2)
and positions the insertion point on a specific line in the document.
- Byte Offset indicates the current byte offset and positions the
insertion point to a specific byte offset in the document. This function is
used by
hypertext(D-
-
4)
to jump to a
topic header(12-
3)
from a
topic reference pointer(12-
3).
Drop Anchor
Ctrl+F5
Drop Anchor sets a place marker for the
Return to Anchor(3-
15)
command to return to. Useful when browsing large documents, or with
hypertext(D-
-
4).
Return to Anchor
Shift+F5
Return returns to the previously selected
hypertext(D-
-
4)
topic reference(12-
3)
or the previous anchor (see the
Drop Anchor(3-
15)
command).


 Apropos Customer Service home
page 617-648-2041
Last Modified: March 23, 1996
Copyright © 1996 Apropos, Inc.
 The Copy Range command copies a named range of text to the
Windows clipboard(D-
-
9)
for use as a linked
OLE(D-
-
5)
object in another application. To export text for an embedded or
static object, you can also use the Edit
Copy(3-
9)
command.
 The Paste Special command pastes one of various different
 The Edit Text Object dialog is a miniature document window used to edit
compound objects in a document. It is invoked to insert a new object by
the Edit | Insert
Header(3-
11),
Footer(3-
12),
and
Footnote(3-
12)
commands.
 The Insert Object dialog command inserts an object from another
application, such as a
 Use the Links dialog to display all the links you have in a document to
other applications such as
 Text to Find: enter the text to find, or paste it from the internal
 The tiny Press Space to Abort dialog interrupts searching or replacing
if you click the Abort button or press Space. The
hidden characters window(5-
4)
displays search progress.
 The Replace command searches for and replaces specified text or
formatting in the active document.
 If you selected Prompt on replace, and Smart Characters finds the search
target, the Replace the Selected Text dialog asks you to confirm
replacement:
 The Go To dialog displays the current bookmark, page, line, and byte
offset, and jumps to a specified location. Enter the new bookmark name or page,
line, or byte offset number, and select OK. Smart Characters scrolls the
document if necessary to keep the
insertion point(5-
1)
visible.