

 Use your PC to Master Japanese and Chinese
Select Input Mode
The select input mode commands switches to the selected input mode. This
command is also available on the Right Mouse button speed menu. It is usually
easier to switch input modes by pressing the F12 or Side + or - keys.
For a list of input modes, see the corresponding
object type codes(5-
11).
See also
Entering Object Type Codes(5-
7).
The Same Input Mode
The Same input mode (Side Asterisk (*) or Alt+F12) inserts and displays
all
typewriter keys(5-
6)
according to the current
object type(4-
2),
and that type's Auto Input mode. The Same mode is handy for
making corrections to existing text: you do not have to repeatedly change the
input mode. The Same is particularly useful when working with the
Ascii Codes(5-
5)
window.
Toggling Input Modes
Previous Mode (Side - or Shift+F12) changes the
input mode(4-
2)
to the previous
preferred mode(D-
-
6).
Next Mode (Side + or F12) changes the input mode to the next preferred
mode.
Setup
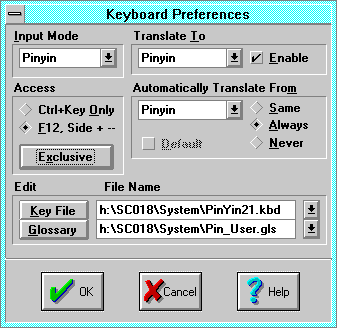 The Keyboard Setup command opens the Keyboard Preferences dialog
to control the way the keyboard and
dynamic glossaries(4-
6)
work in word processor windows for each of Smart Characters input modes.
The Keyboard Setup command opens the Keyboard Preferences dialog
to control the way the keyboard and
dynamic glossaries(4-
6)
work in word processor windows for each of Smart Characters input modes.
The dialog box displays and sets preferences for the input mode displayed in
the Input Mode control. To set the preferences for a another input mode,
select it.
Principal input modes that use macro keyboards and dynamic glossaries are
linked into source and destination modes (e.g., Romaji >> Hiragana,
Pinyin >> Pinyin, or Pinyin >> Bpmf) according to the Translate
To and Automatically Translate From groups. These linked input modes
must be set up to not conflict. Macro keyboard and dynamic glossary files are
selected by the Key File and Glossary controls.
- For example, Chinese typically set the Chars | Automatically Translate
From input mode to Bpmf or Pinyin, while Japanese users would
specify Hiragana. Those who wish to use pinyin pronunciations use the
Pinyin >> Pinyin keyboard, while bopomofo users may type in pinyin
to yield bopomofo using the Pinyin >> Bpmf keyboard.
- Input Mode displays the preferences for the selected input
mode.
Access controls the F12, Size +/-
preferred mode(D-
-
6)
list.
- Ctrl+Key Only deactivates access via F12 and the Side Plus and Minus
keys. To save time, check this option for all input modes that you do not
frequently use.
- F12, Side + - activates access via F12 and the Side Plus and Minus
keys. For convenience, check this option for all input modes that you
frequently use.
- Exclusive sets an input mode's access to F12 and Side Plus Minus,
and suppresses other competing input modes' access. This is most meaningful
when the Input Mode control is set to Hiragana, Pinyin, or
Bpmf.
- For example, switching between Pinyin and Bpmf is simply a
matter of selecting the Exclusive button. Competing modes are
automatically set to Ctrl Key Only, and their AutoInput modes adjusted
to one of three new states: Same, Always, and Never. The
Pinyin AutoInput mode is set to Never to prevent conflicts when
using the Pinyin >> Bpmf input mode.
- Translate To is the destination mode that this source mode will
translate to.
- Enable enables the Translate To process. Use this option to
temporarily enable and suppress translation.
- Automatically Translate From is the source mode that will be
translated from when this mode is active.
- Same: translation will be active only from
The Same(3-
26)
mode (toggled by the Side Asterisk or Alt+F12 keys).
- Always: selecting the input mode will always activate the
translation.
- Never: translation never occurs.
- Default is the
object type(4-
2)
in effect at the beginning of a line. Check to make this type the default for
special purposes. Unchecking makes English the default. Keep the default type
English except under special circumstances.
- Key File edits the macro keyboard file (if any) for this input mode.
The key file is a two part file: the first part defines the key mappings and
romanizations for the underlying
alphabetic font(4-
13),
and alternate romanizations. The second part contains keyboard macros which are
identical in form and function to dynamic glossary entries. Use keyboard macros
for organization wide common text.
- Glossary edits the
dynamic glossary(4-
6)
file (if any) for this input mode. This command activates the
permanent document(4-
3)
window containing the dynamic glossary corresponding to the open
syllable(4-
7)
dictionary. All other dynamic glossaries are edited in a new window. Cut and
paste dynamic glossary entries that should be shared with other users in a
group into the keyboard file, which you can share with other users.
- The File Name controls specify the macro keyboard and dynamic
glossary file names. If you don't know an exact name, use wild cards in the
name to invoke the
Open File(3-
1)
dialog to find the correct file. You can specify separate dynamic glossaries
for each input mode, or combine them into one for use with all input modes,
taking care to avoid valid syllable romanizations.
- Hint: Keyboard settings and other input mode and translation preferences
are stored in the current user or project. If you need to alternate keyboard
settings frequently (possibly because you switch languages), consider creating
additional projects to hold the settings rather than using this dialog
repeatedly.
- Note: Smart Characters launches in the
preferred mode(D-
-
6)
corresponding to the open
syllable(4-
7)
dictionary specified by the
Translate | Select Dictionaries
command.
Editing Keyboards and Glossaries
- Select Keyboard | Setup | Glossary (or KeyFile) to load the
desired keyboard or glossary file into a window. When opened using this
selection, File | Save automatically recompiles and reloads the keyboard
macros for use. Edit the file as you would your
user dictionary(4-
7),
then use File | Save to reload the keyboard for testing. If it doesn't
work, use View | Codes to debug. See the
keyboard definition format(12-
4).
Enable UnDo
The Enable UnDo command enables the Un-Do and Re-Do
commands.
Add Selection to Glossary
The Add Selection to Glossary command adds selected text to the active
dynamic glossary(4-
6)
via the
Verify Dictionary or Glossary Entry(3-
29)
dialog.
New entries are added to the end of the dynamic glossary window. You can view,
edit, move, or delete them by switching to the window. See
Adding to the User Glossary(3-
28).
Adding to the User Glossary
The Keyboard
Add Selection to Glossary(3-
28)
command copies the current selection to the
dynamic glossary(4-
6)
file in the
Dynamic Glossary(4-
4)
window (number 3 on the Window menu).
On launch, Smart Characters loads the dynamic glossary that corresponds to the
key
object type(4-
2)
associated with your
syllable(4-
7)
dictionary. If the syllable dictionary is kana based, the hiragana glossary is
loaded. If the syllable dictionary is bopomofo or pinyin, the keyboard
preferences are checked to see whether pinyin is translated to bopomofo or to
pinyin. If translated to pinyin, the pinyin glossary is loaded, otherwise the
bopomofo glossary is loaded.
The syllable dictionary is specified by the Translate
Select Dictionaries(3-
33)
command, and saved in the current user or project .ini file. However, the
association between the syllable dictionary and the key object type is defined
in the user or project .ini file by the syllable dictionary entry, which
specifies the control code that corresponds to the dictionary key object type
(e.g., ^V specifies bopomofo, ^W specifies hiragana, etc.).
Verify Dictionary or Glossary Entry
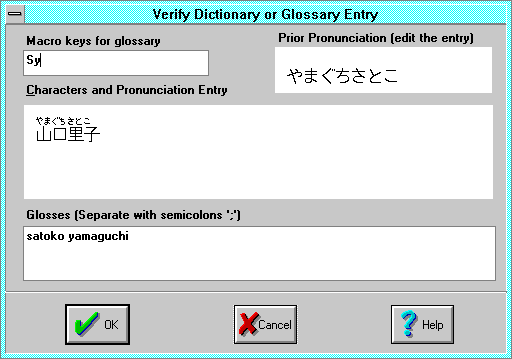 Macro keys for glossary specifies the
dynamic glossary(4-
6)
entry. The key can be up to 4 characters in length. Avoid keys that conflict
with valid pronunciations, otherwise the romanization conversion for that
pronunciation will no longer work. (You should delete these interfering entries
from the dynamic glossary.) You can use an initial capital letter to bypass
romanization conversion.
Macro keys for glossary specifies the
dynamic glossary(4-
6)
entry. The key can be up to 4 characters in length. Avoid keys that conflict
with valid pronunciations, otherwise the romanization conversion for that
pronunciation will no longer work. (You should delete these interfering entries
from the dynamic glossary.) You can use an initial capital letter to bypass
romanization conversion.
Characters and Pronunciation defines the text and pronunciation entry.
For best results, add pronunciations to each Chinese character separately.
- Glosses specify the
glosses(D-
-
4)
to be applied to the entry. Separate glosses with a semicolon followed by a
space ("; ").
- Prior Pronunciation displays the pronunciation of the previous entry
for information only. Edit the Characters and Pronunciation entry.
Extend Selection
F8
Extend Selection selects text using the insertion point and the arrow
keys, preparing for commands that work on selected text. The BLOCK F8
indicator displays on the
status bar(5-
2).
You can also make a selection by pressing and holding the Left Mouse button as
you drag the mouse.
Character Map
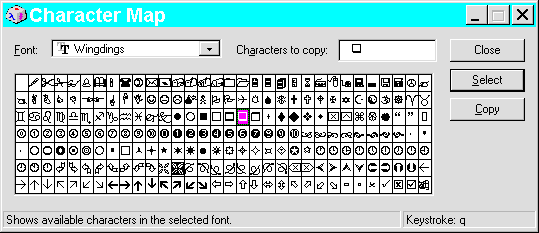 The Character Map command opens a
character map(D-
-
1)
window to select characters from a Windows font and copy them to the
Windows Clipboard(D-
-
9).
To insert a special symbol character into a document at the insertion point:
The Character Map command opens a
character map(D-
-
1)
window to select characters from a Windows font and copy them to the
Windows Clipboard(D-
-
9).
To insert a special symbol character into a document at the insertion point:
- Select a font in the character map window.
- Double click each character to insert, then select Copy.
- Switch to the document, and select Edit | Paste Special | Text to
paste the special symbol characters into the document.
- Select the character(s), and then use the Format
Character(3-
16)
dialog Typeface control to change them to the same font you used in the
character map window.
For frequently-used characters, note the character
code displayed on the character map status bar Keystroke indicator to
use later. See
Using Extended Characters(5-
10).
To specify another character map application, add or change the
Scw.ini Workstation(B-
-
2)
section CharMap entry to specify the desired application.
Macro
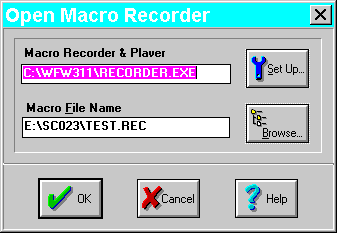 The Macro dialog launches an external macro utility application
(program) to record and play macros. You can specify a macro file to
automatically load into the application, or specify another macro application.
The Macro dialog launches an external macro utility application
(program) to record and play macros. You can specify a macro file to
automatically load into the application, or specify another macro application.
- Macro Recorder & Player specifies the macro application program.
This is typically the Windows Recorder.exe but you can enter and use
another macro recorder or player.
- Setup displays the
Open File(3-
1)
dialog to locate an alternate macro recorder and player application.
- Macro File Name specifies the name of a macro file to be opened by
the macro application.
- Browse displays the Open File dialog to locate an alternate
macro file.
- OK launches or switches to the macro application.
Apropos Customer Service home
page 617-648-2041
Last Modified: March 23, 1996
Copyright © 1996 Apropos, Inc.